イメージ圧縮してDropboxで公開するサービス
DropboxのPublicフォルダとは
現在(2017-03-15以降)、この機能(DropboxのPublicフォルダ)は使えない
- 今時のDropboxには、Publicフォルダがある。
- Publicフォルダに入れたファイルには、「パブリックリンク」と呼ばれるURLが与えられる。
- そのURLをブラウザに与えれば、画像を表示したり、ファイルをダウンロードしたりできるのである。
- 「パブリックリンク」として与えられるURLの仕組みを見てみると、以下の要素の組み合わせになっている。
- Publicフォルダを表現する、ユーザーごとのID番号*1
- Publicフォルダを起点とする、ファイルパス。
https://dl.dropbox.com/u/ユーザーごとのID番号/ファイルパス
- もしPublicフォルダ内にimagesフォルダを作って、その中にscreenshot.pngを入れたとしたら、
- 自分のDropboxでは、以下のURLでアクセスできるようになる。(システム環境設定の画像)
https://dl.dropbox.com/u/2281410/images/screenshot.png
- そして、上記のURL使ってimgタグを生成すれば、webページに画像が表示される。
- 幅を450pxに制限することで、Retina対応の画像にしている。(元画像900px)
<img src='https://dl.dropbox.com/u/2281410/images/screenshot.png' width= 450.0 />
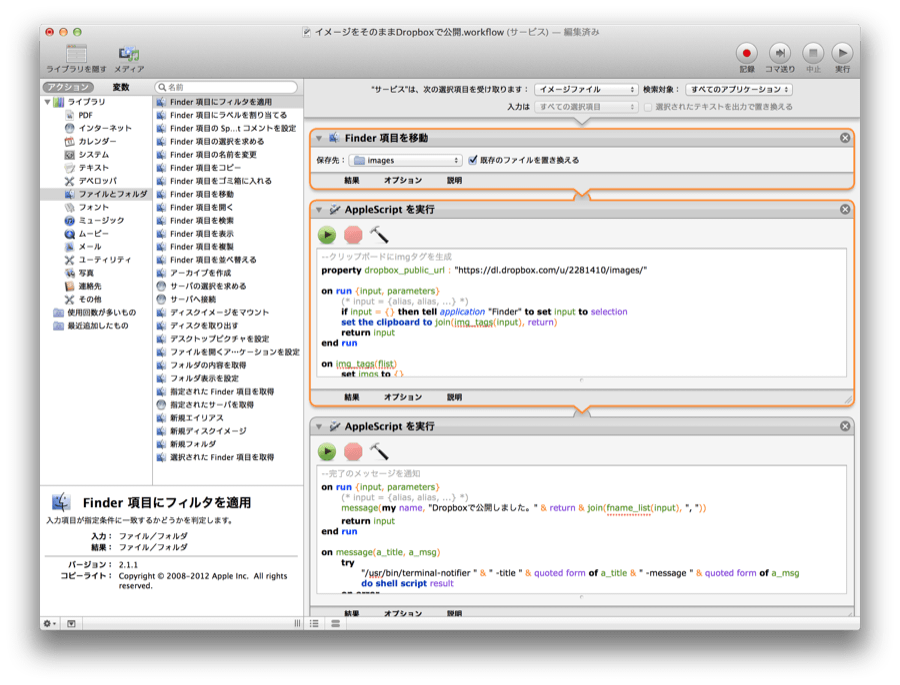
イメージをそのままDropboxで公開する
- 上記一連の操作を素早く実行するAutomatorサービスにしてしまえば、この上ない幸せを感じられるはず。さっそくやってみた。
- Finderで画像ファイルを選択して、「イメージをそのままDropboxで公開」サービスを実行すると、
- 好みの場所にペーストすれば、パブリックリンクをURLとするimgタグの出来上がり。webページに画像が表示されるのだ。
以下、各アクションの詳細
- 「Finder項目を移動」アクションで、Dropbox/Public/imagesを指定しておく。
--クリップボードにimgタグを生成

 property dropbox_public_url : "https://dl.dropbox.com/u/0000000/images/" --自分のDropbox/Public/imagesへのURLを設定しておく


 on run {input, parameters}   (* input = {alias, alias, ...} *)

   if input = {} then tell application "Finder" to set input to selection

   set the clipboard to join(img_tags(input), return)   return input

 end run


 on img_tags(flist)   set imgs to {}   repeat with an_alias in flist

     tell application "Image Events"

       launch

       set myImage to open file (an_alias as text)       set {w, h} to myImage's dimensions

     end tell

     if w > h then

       set imgs's end to "<img src='" & dropbox_public_url & fname(an_alias) & "' width=" & w / 2 & " />"

     else

       set imgs's end to "<img src='" & dropbox_public_url & fname(an_alias) & "' height=" & h / 2 & " />"

     end if

   end repeat

   imgs

 end img_tags


 on fname(f)   try

     tell application "Finder" to (f as alias)'s name

   on error

     tell application "Finder" to (f as POSIX file as alias)'s name

   end try

 end fname


 on join(sourceList, delimiter)   set oldDelimiters to my text item delimiters

   set my text item delimiters to delimiter

   set theText to sourceList as text

   set my text item delimiters to oldDelimiters

   theText

 end join
--完了のメッセージを通知

 on run {input, parameters}   (* input = {alias, alias, ...} *)

   message(my name, "Dropboxで公開しました。" & return & join(fname_list(input), ", "))   return input

 end run


 on message(a_title, a_msg)   try

     "/usr/bin/terminal-notifier " & " -title " & quoted form of a_title & " -message " & quoted form of a_msg

     do shell script result

   on error

     activate

     display dialog a_title & return & a_msg buttons {"OK"} with icon 1 giving up after 5

   end try

 end message


 on fname_list(alias_list)   set a_list to {}   repeat with an_alias in alias_list

     set a_list's end to fname(an_alias as text)   end repeat

   a_list

 end fname_list


 on fname(f)   try

     tell application "Finder" to (f as alias)'s name

   on error

     tell application "Finder" to (f as POSIX file as alias)'s name

   end try

 end fname


 on join(sourceList, delimiter)   set oldDelimiters to my text item delimiters

   set my text item delimiters to delimiter

   set theText to sourceList as text

   set my text item delimiters to oldDelimiters

   theText

 end join
インストール1
- イメージをそのままDropboxで公開.workflow.zipをクリックしてダウンロードし、解凍する。
- 二本指クリックして、イメージをそのままDropboxで公開.workflowを開く。
- 「Automatorで開く」ボタンを押す。
- 「Finder項目を移動」アクションで、上記Dropbox/Public/imagesを設定する。
- AppleScriptアクション「クリップボードにimgタグを生成」で、1行目のproperty dropbox_public_url: に、自分のパブリックリンクのURLを書き込む。
- パブリックリンクのURL=Publicフォルダ内のファイルを2本指クリックして、Dropbox >> パブリックリンクのコピー、で確認できる。
- 一旦、ワークフローを保存して、再び二本指クリックで開く。
- 「インストール」ボタンを押して、インストールが完了する。
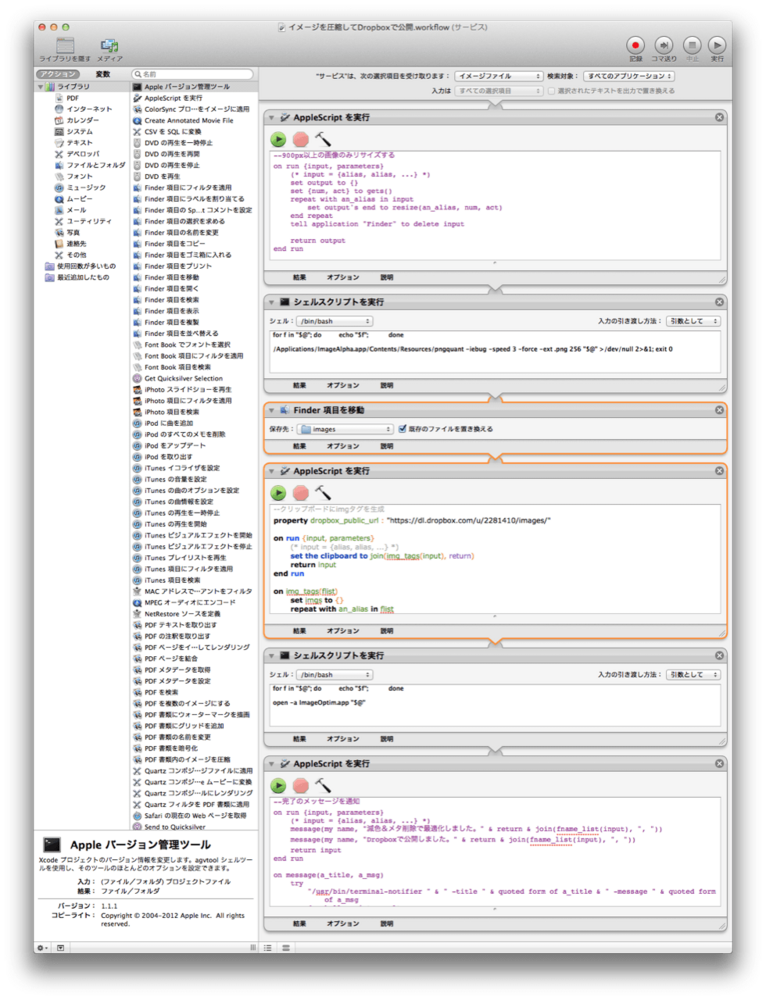
イメージを圧縮してDropboxで公開する
- Automatorの素晴らしいところは、各アクションの独立性を高めてコーディングしておけば、ほとんど手直しなしで合体や分離できるところ。
- ファイルパスがalias形式のリストなのか、unix形式のファイルパスのリストなのか、注意しておく必要があった。
- AppleScript アクションにはalias形式のリストが渡される。
- シェルスクリプト アクションにはunix形式のファイルパスのリストが渡される。
- 一旦unix形式のファイルパスになってしまったら、自分でalias形式に変換しない限りunix形式のファイルパスが渡される。
- シェルスクリプト アクションの後は、たとえAppleScriptアクションが続いていても、unix形式のファイルパスが渡される。
- AppleScriptアクション側でalias形式・unix形式の両方に対応しておけば、シェルスクリプト アクションが混ざっても問題なく動く。
インストール2
- イメージを圧縮してDropboxで公開.workflow.zipをクリックしてダウンロードし、解凍する。
- 以降の操作は、上記インストール1と同じ要領で行う。
*1:ユーザーごとのID番号は、実際に「パブリックリンクをコピー」してどこかにペーストしてみれば、簡単に確認できる。


