Leopard プレビュー.appの底力
(Leopard Preview.app's potential)
アプリケーションの名前こそ「プレビュー」だが、すでに機能は「レタッチ」レベルなのであった!
The application's name is "Preview", but the function is "retouch" level!
スクリーンショット(Screen capture)
- ウィンドウの影なし撮影ができる。(command-shift-4 & spaceの影あり撮影と使い分けると便利)
- "File >> Grab >> Window" is without shadow.(Properly, we can use that "command-shift-4 & space" is with shadow.)
- タイマー撮影ができる。
- "File >> Grab >> Timed Screen"
-
-
- command-shift-5は自分で割り当てたショートカット
- "command-shift-5" is my shortcut.
-
クリップボードからプレビュー(Preview From Clipboard)
- command-shift-4 後、control-クリックでクリップボードに撮影して、プレビューでcommand-Nを実行すると、撮影内容がプレビューで表示できる。
- We can copy a window image to the clipboard by "command-shift-4 & control-click", and open the window image of clipboard by "command-N" on Preview.app.
- Finderでアプリケーションを選択してcommand-C、プレビューでcommand-Nを実行すると、アイコンファイルがプレビューで表示できる。
- We can open icon image by "select application & command-C" on Finder.app and "command-N" on Preview.app.
カラーを調整 - 色だけでなく、画像補正と言える(Adjusting color - That's adjusting image and color)
- メニューバーで、ツール >> カラーを調整
- "Tools >> Adjust Color" on menu bar
選択機能も便利(A convenient selection)
- ツールバーの選択
- "Select" on toolbar
- 図形で抽出、カラーで抽出でちょっと高度な切り抜きも...
- A advanced clipping by "Extract Shape", and "Instant Alpha"
- あまり上手でないけど、どうにか出来た。
- Although it was not so skillful, it was able to do somehow or other.
- 参考ページ:Preview Tutorial - Extract Shape
- A reference page: Preview Tutorial - Extract Shape
合わせ技(combination)
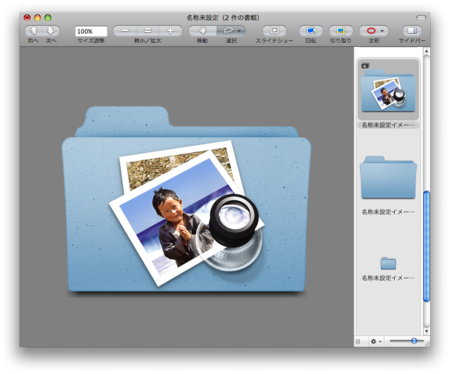
- 以上の技を組み合わせれば、コピー&ペーストで二つの画像は簡単に合成できる。(フォルダアイコン + アプリケーションアイコンなど)
- By using a combination of the function mentioned above, we can compose two images by copy and paste.(a folder icon and a application icon etc.)
-
- ペーストする画像は、配置と同時にフリーハンドでサイズ調整してもいいけど、
- When arranging an image, we may resize it. But...
-
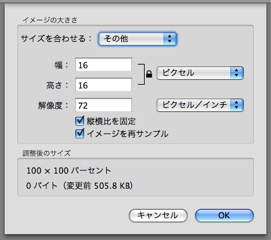
- サイズを調整...で変更してからコピーすれば、縦横比を確実に維持したまま、縮小率も明確にして合成できる。
- If we resize an image by "Tools >> Adjust Size..." , the aspect ratio is maintained and we can know reduction rate clear.
-
-
- ペーストした画像の位置を決定して選択状態を解除してしまうと、その後の移動は出来ない。(レイヤーの概念はなく、1枚の画像に合成されてしまう。)
- After I decide the position of the pasted image and remove the selective state, we can not move the pasted image. (There is not the concept of the layer, and it is composed by one piece of image.)
-
- 周囲をぼかして、特定の部分を強調する。
- By lowest sharpness of circumference, we can emphasize a specific part.
-
- 強調したい部分を長方形で選択してコピー。
- I select a part to emphasize by a rectangle and copy it
-
- カラーを調整でシャープネスを一番左にして、全体をぼかして一旦保存。
- I click "Tools >> Adjust Colors" and set sharpness slider to left, and save it once.
-
- その後、事前にコピーしていた内容をペーストすれば、その部分だけくっきり浮き上がる。
- Only the part is emphasized clearly afterwards if I paste the contents which I copied beforehand.
- 周囲を暗くして、特定の部分を強調する。
- By darkening circumference, I can emphasize a specific part.
-
- 強調したい部分を長方形で選択してコピー。
- I select a part to emphasize by a rectangle and copy it.
-
- カラーを調整で露出を適度に暗くして、全体を薄暗くして一旦保存。
- I click "Tools >> Adjust Colors" and exposure is moderately made dark., and save it once.
-
- その後、事前にコピーしていた内容をペーストすれば、その部分だけ明るく浮き上がる。
- Only the part is emphasized brightly afterwards if I paste the contents which I copied beforehand.
- ちなみに、一つのウィンドウで複数画像を開くことができるのだ。
- By the way, we can open two or more images with one window.
注釈 - 文字や図形を書き込むことができる(Annotate - we can insert text, oval, rectangle and line.)
- ツールバーの注釈
- "Tools >> Annotate"
-
- カラーパネルで好みの色を設定できる。
- We can set a favorite color with "Tools >> Show Colors".
-
- フォントパネルで好みの文字を設定できる。(文字の色はカラーパネルで)
- We can set a favorite font with "Tools >> Show Fonts".(Font color is set by "Show Colors")
-
-
- 文字や図形は、編集中の書類を閉じるまで自由に操作できる。保存してもOK。(書類を閉じて開き直すと、文字や図形は1枚の画像として合成されてしまう。)
- We can operate text and figure freely till I close documents editing. OK, even if saved. (When I close documents and open again, text and figure are composed as one piece of image. )
-
回転と反転も自由自在(Rotation and flipping are free freedom.)
- ツール >> 反時計回りに回転・時計回りに回転
- "Tools >> Rotate Left, Rotate Right"
- ツール >> 水平方向に反転・垂直方向に反転
- "Tools >> Flip Horizontal, Flip Vertical"
その他(Others)
- 表示 >> イメージ背景を表示 command-option-B(透明部分が網目模様になる)
- "View >> Show Image Backgroud" command-option-B (A transparent part becomes mesh pattern)
- 表示 >> スライドショー command-shift-F
- "View >> Slideshow" command-shift-F
- 最近使った項目
- "Open Recent"
-
- 最近使った10ファイルが記録される。
- 10 files which I used recently are recorded.
- ブックマーク command-D
- "Bookmarks" command-D
-
- 画像であれば、任意のファイルを、任意の名前で、いくつでも記録できる。
- If it's an image, We can record an arbitrary file by an arbitrary name with many.
-
- PDFであれば、任意のファイルとページを、任意の名前で、いくつでも記録できる。
- If it's PDF, We can record an arbitrary file and page by an arbitrary name with many.
- 編集 >> 選択したイメージをゴミ箱に入れる command-delete
- "Edit >> Move Selected Image to Trash" command-delete
-
- 表示中のファイルをゴミ箱に移動できる。(内容を確認して破棄できるので便利)
- A file on display is movable to trash. (Because I confirm contents and can delete it, it is convenient.)
PDFの操作(In the case of PDF)
画像と違って、PDFの特性による違いはあるが、以下の操作が可能。
Unlike an image, there is difference by the characteristic of the PDF, but the following operation is possible.
- ページの移動、テキストの選択、領域の選択ができる。
- Order change of pages, selection of text, selection of area.
- PDF本文の文字に、ハイライト・取り消し線・アンダーラインを装飾できる。
- We can decorate PDF text with highlight, cancellation line, underline.
- 注釈文字や図形を書き込むことができる。
- We can insert explanatory notes and figures.
- 以下は、ハイライト・アンダーラインを引く・長方形を追加・メモを追加した状態。
- "Highlight Text", "Underline Text", "Add Rectangle", "Add Note" was executed in next figure.
プレビュー、素晴らしい!クイック ルックでその存在感が薄れた気がしたが、とんでもない。レタッチ機能を追加してバージョンアップしていたのであった。
Preview.app is wonderful! I had a feeling that the significance of existence faded by quicklook, but it's wrong. A retouch function was added and Preview.app had upgraded.
参考ページ
以下のページがたいへん参考になりました。感謝です!
The following pages served as a reference very much. Many thanks!


