オーディオファイルの繋ぎ方
複数のオーディオファイル(.m4a)を1つにまとめたくなった。しかし、オーディオファイルはテキストファイルと違って、単純にcatコマンドなどでは連結できなかった...。
cat sample1.m4a sample2.m4a > total.m4a
例えば、上記コマンドを実行しても、ファイルサイズは2ファイルの合計になるのだが、再生されるのはsample1.m4aの内容だけだった。データ構造としてはsample1.m4a+sample2.m4aになっているはずなのだが、その状態ではオーディオファイルの構造としては問題ありのようだ。(最初のsample1.m4aしか再生されないので)
Quicktime 7 Proで繋ぐ
- もし、Quicktime 7 Proのライセンスキー(3400円)を持っているのなら、オーディオファイルをコピー&ペーストで次々と編集して、1つのファイルにまとめることができる。
- 但し、出来上がるのはmovコンテナに複数のm4aオーディオファイルが入った形式のファイルである。
- 元のm4aオーディオファイルが無劣化で入っていると思うので、音質は維持されると思う。

- command-A、command-Cで、J-WAVE_20130223-1757_2.m4a全体選択してコピー。

上記手順の繰り返しで、3つ以上のオーディオファイルも次々と連結できるのだ!
選択したファイルをQuickTime Proで連結するAppleScript
- しかし、毎回10ファイル以上を連続コピ&ペーストはさすがに面倒なので、上記手順をAppleScriptにまとめてみた。
- Finderでファイルを選択してスクリプトを実行すれば、AppleScriptが素早く無駄のない操作で連結してくれるのだ!
- 但し、QuickTime Proが必要なのが痛い所...。
tell application "Finder"

   set AVFiles to selection

   set fileNum to AVFiles's number

   repeat with i from 1 to fileNum

     my QT_Pro_join(AVFiles's item i as alias, i, fileNum)   end repeat

 end tell


 on QT_Pro_join(f, i, n)   tell application "QuickTime Player 7"

     activate

     open f

     delay 0.5

     tell document 1

       if i ≠ 1 then paste

       select all

       copy

       if i ≠ n then close

     end tell

   end tell

 end QT_Pro_join
クロスフェードの問題
- なんとかオーディオファイルを1つにまとめることができたが、上記の方法では決して満足できない問題がある。
- それは、連結した曲と曲の境目で、再生音がブチッと途切れてしまうこと...。
- iTunesで連続視聴する時は、曲をクロスフェードする設定にしていたので、許せる範囲で自然な繋がり方だった。
- ところが、QuickTime Proのコピー&ペーストでは、クロスフェードの処理が完全になくなってしまう...。
- なんだか強制終了された曲が、7、8回連続再生されるようで、せっかくのラジオ番組が台無しという感じ。
- これを回避するためには、どうしても曲と曲の境目をクロスフェードさせたい。さて、どうやって?
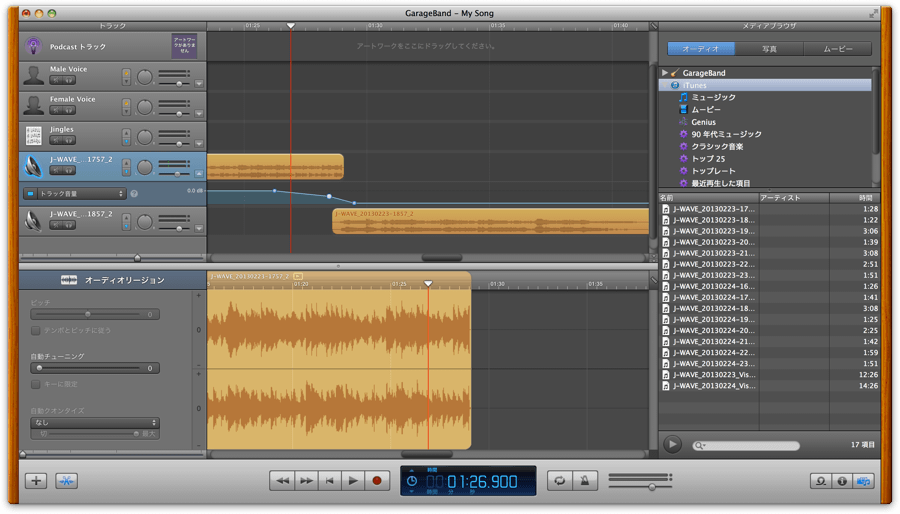
- GarageBand: 購入マシンに標準添付されるアプリケーション
- http://ja.wikipedia.org/wiki/GarageBand
- 単純に複数の曲を繋げたりすることもできた。
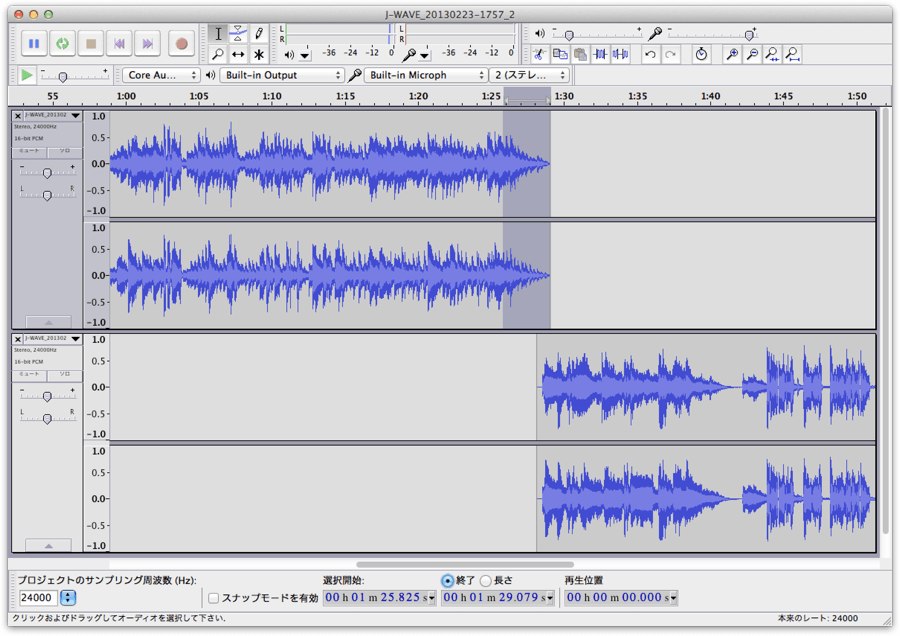
- 曲と曲をオーバーラップさせて、前の曲の音量をフェードアウトさせるように設定すればOK。
- Audacity: フリーのオーディオエディタ・レコーダー
- 紅猫音楽房 Audacityを用いたクロスフェードデモ
- GUIの操作方法に違いはあるが、Audacityでも基本的に同じ考え方でクロスフェードできた。
手間の問題
- GUIの音楽制作ソフトウェア(DTM)を使えば、自分がやりたいほとんどのことはできる。
- しかし、GUIの操作には手間がかかる。どちらも本格的なDTMなので、高度な操作ができるのだけど、
- やりたいことは、iTunesのようなクロスフェードをかけて1つのオーディオファイルにまとめたいだけ。
- もっと単純に、いくつか曲を選択して、クロスフェードで連結のようなメニュー操作で素早く繋げたいのだ。
- 具体的には、毎週末繰り返されるJ-WAVEのショート番組Visionを連続視聴したいだけなのだ。
- Visionを連続視聴したい - ザリガニが見ていた...。
- 土日で毎週15のVisionが放送される。毎週15ファイルが増え続けるとその管理が面倒になりそうなので、まとめてしまおうという発想である。
- 必要な部分の切り取りは、Quicklookで音を聴いて、曲をトリムするサービスメニューを使って、時間指定で素早く編集できるのだ。
- 音質も元ファイルがradiko品質なので、それ以上に高品質にして無駄にファイルサイズを大きくしたくない。
Soundflowerを使って録音する方法
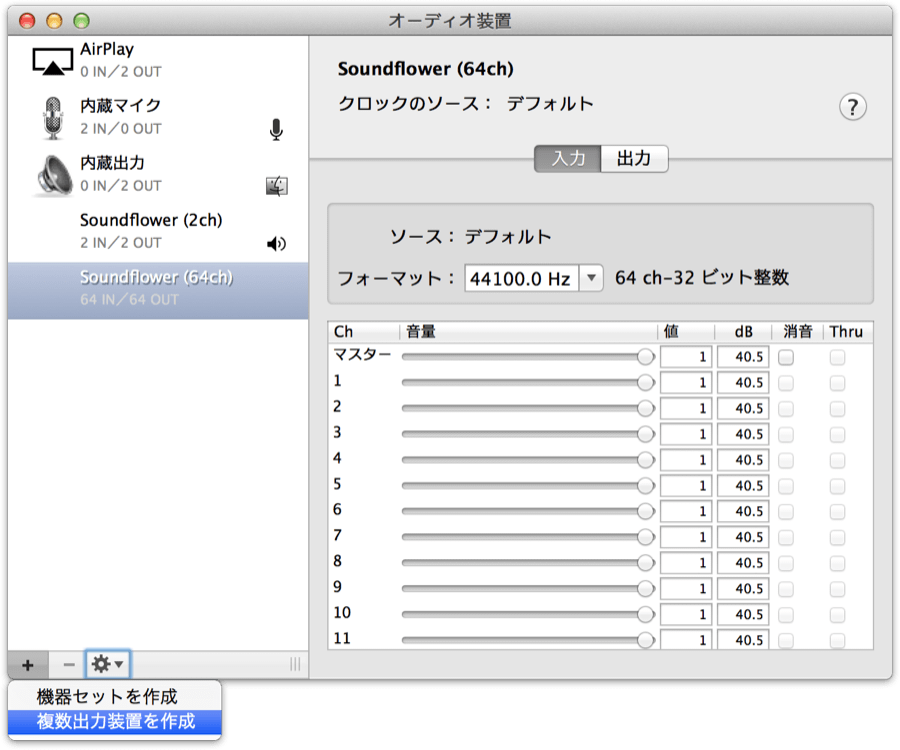
- Soundflowerは、OSX環境で発生するすべての音を取得できる仮想オーディオデバイスである。
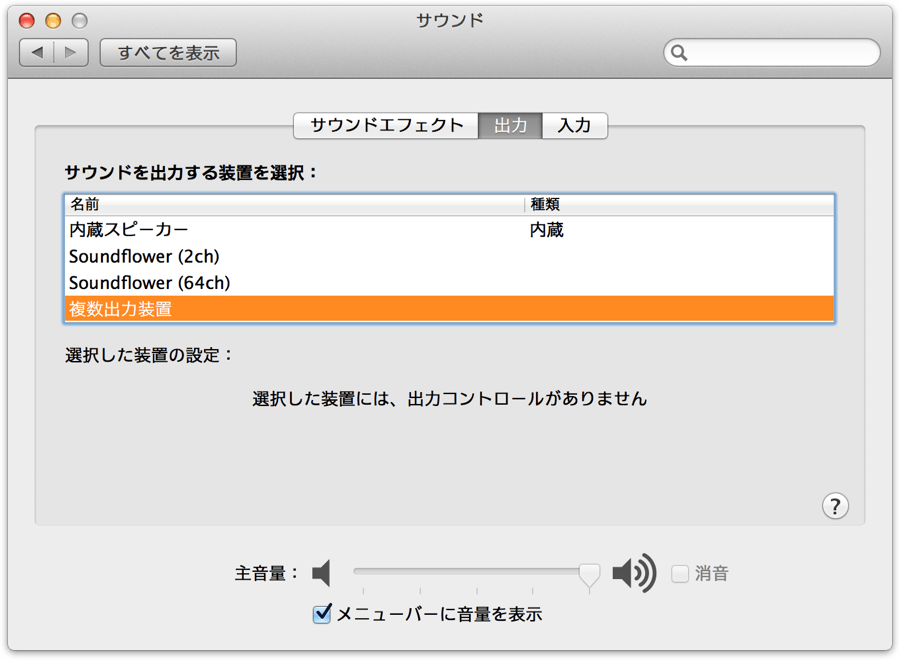
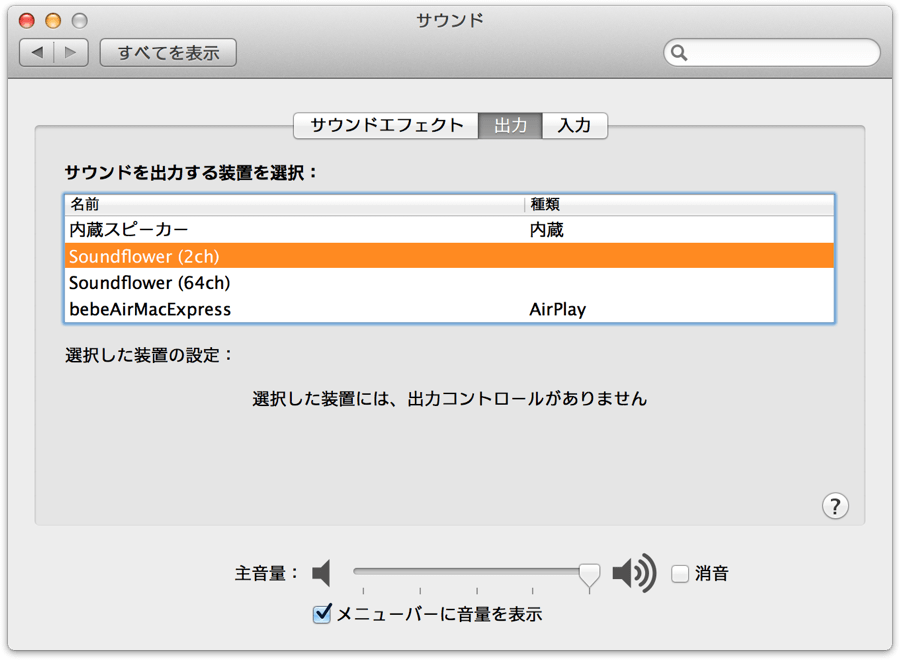
- システム環境設定のオーディオ出力にSoundflowerを指定することで、発生する音はすべてSoundflowerを経由する。
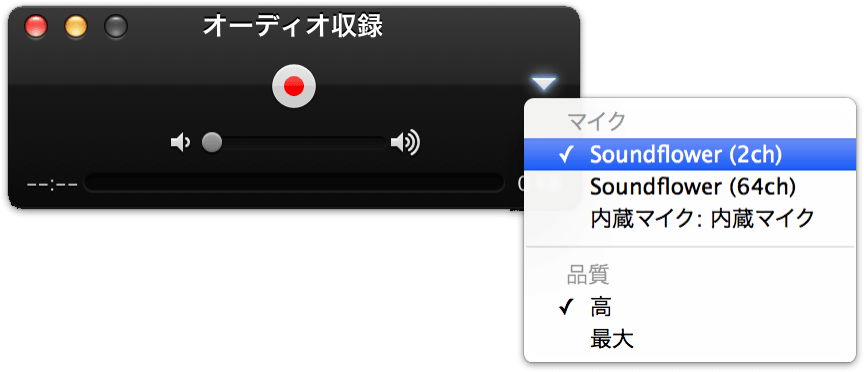
- QuickTime Xの新規オーディオ収録で、入力ソースにSoundflowerを指定すれば、発生する音すべてを録音できるのだ。
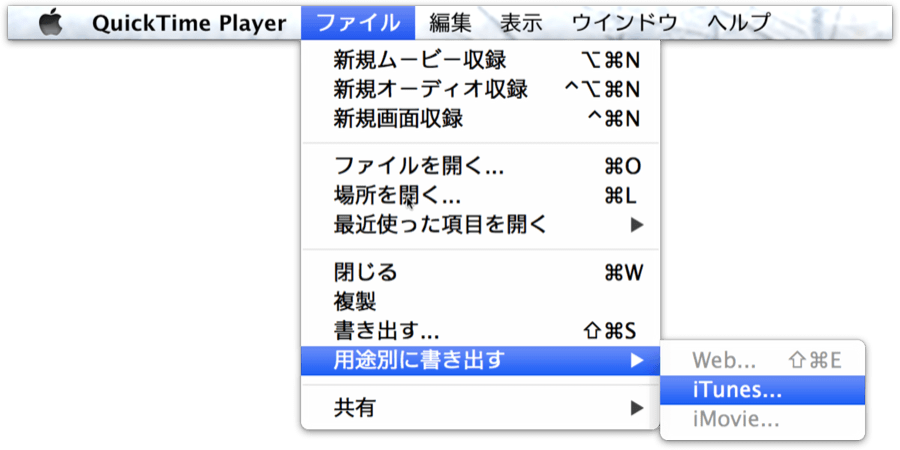
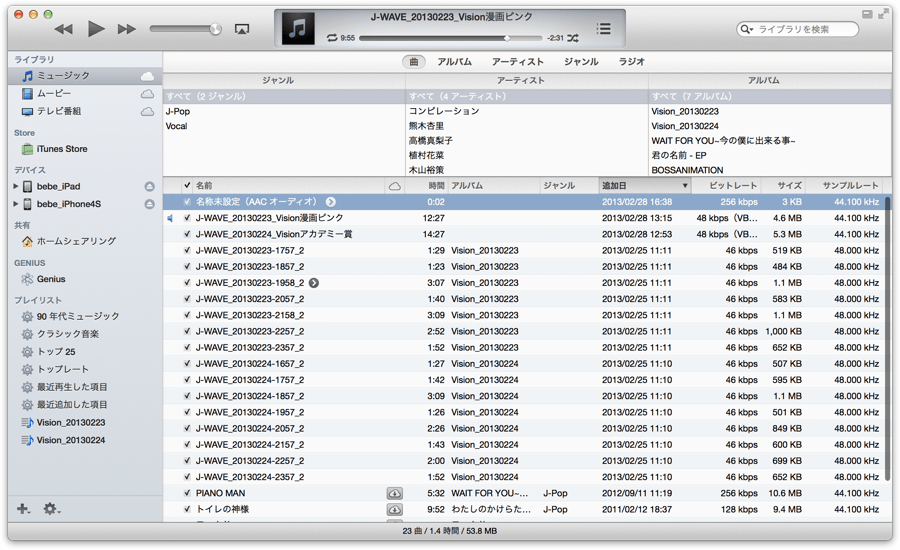
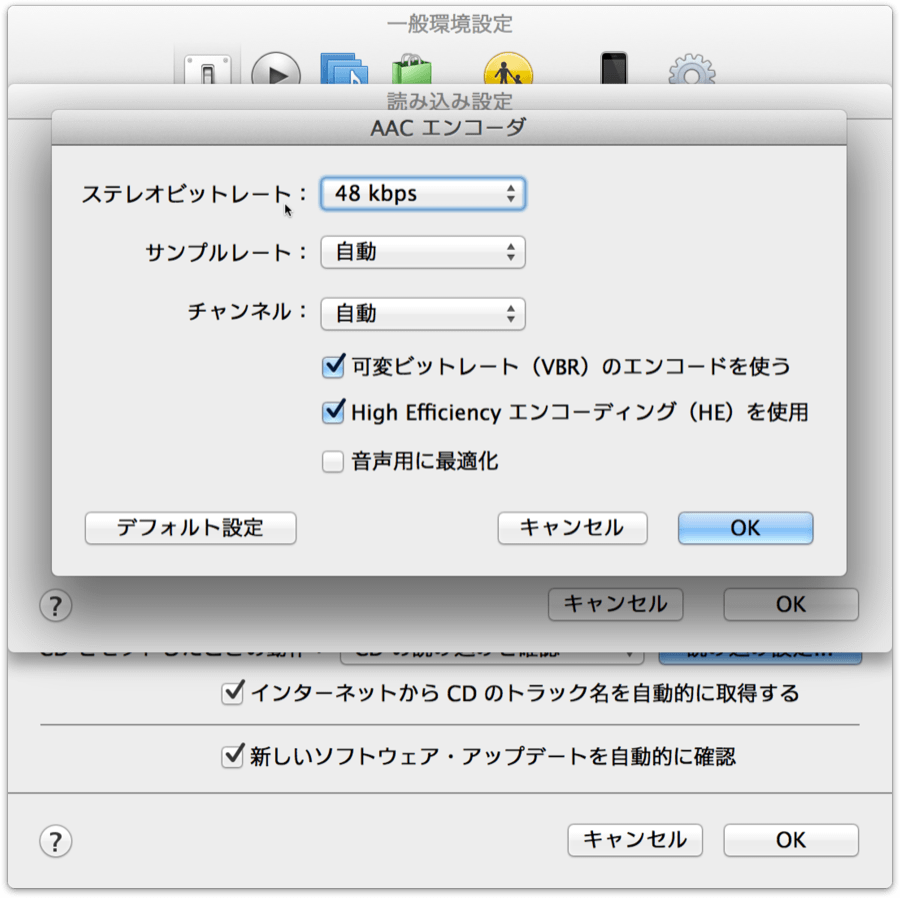
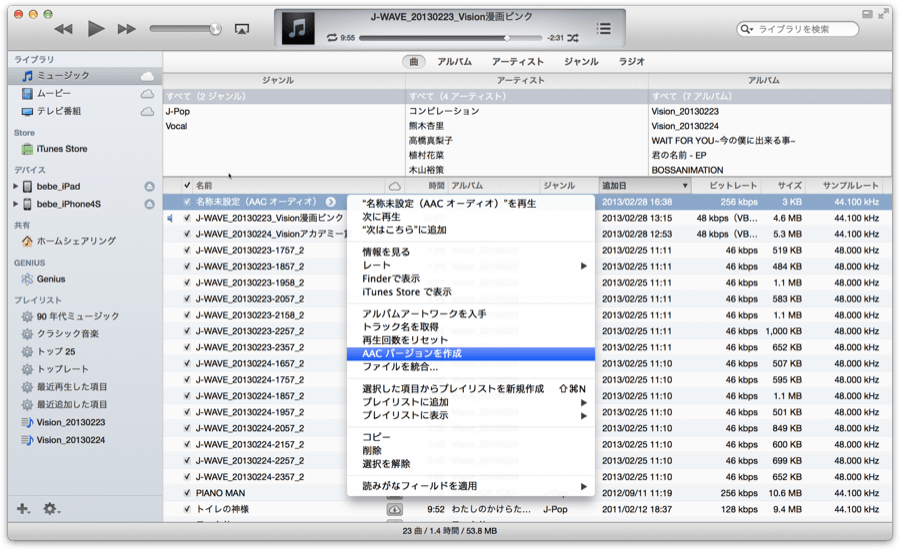
- 二本指タップからAACバージョンを作成して圧縮するのだ。
Soudflowerの設定
- Soundflowerの設定は、/Applications/Soundflower/Soundflowerbed.appを起動して設定する。
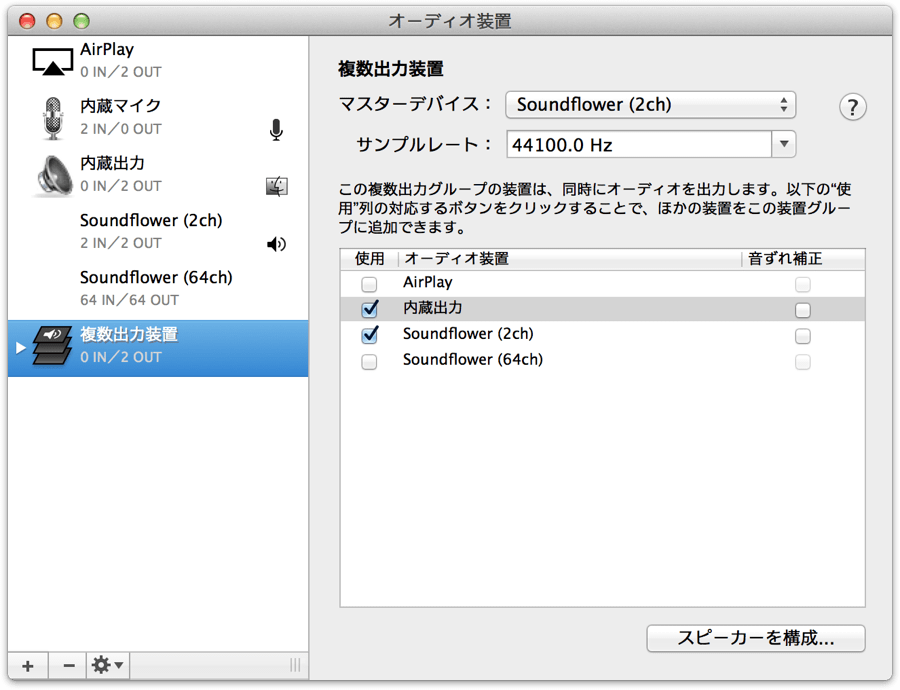
- デフォルトでは、オーディオ出力にSoundflowerを指定してしまうと、内蔵スピーカーの音は鳴らなくなる。
- しかし、どんな音が録音されているのかモニターしたい欲求もある。
- そんな時は、SoundflowerbedでBuilt-In Outputを指定しておく。
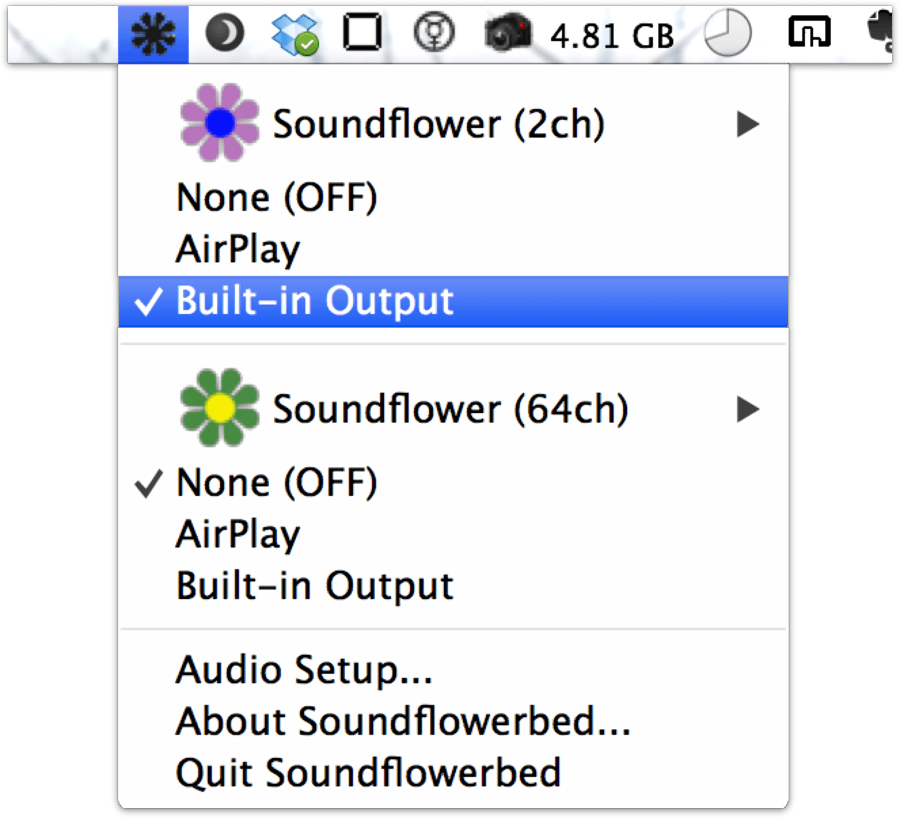
- すると、Soundflowerの音はさらに内蔵スピーカーにも分岐され、そこからも音が聞こえるようになるのだ。
- ところで、Soundflower(64ch)の使い方はよく分からない...。
iTunesとシンクロ録音
- 以上の方法で、オーディオファイルを満足するレベルで繋ぐことはできたのだが、1つ最大の弱点がある。
- それは、音楽ファイルの連結には、全ファイルの再生時間と同じだけの時間がかかってしまう、という点。
- QuickTime Xの操作は手動なので、すべての再生が終わったら録音停止ボタンを押す必要があるのだ。
- しかし、これでは録音が終わるまで気が抜けない...。
- これじゃ高校生の頃、ラジカセでFM番組を録音していたのと変わらないじゃないか、というレベルだ。
- そこで、iTunesの再生と停止に連動して、自動的に録音するAppleScriptを作ってみた。
- また、録音中に警告音や時報が鳴ってしまうのも良くないので、事前にそれらの設定をオフにして、録音が終わったら元に戻すようにしてみた。
set TimeAnnouncement to time_signal_state() --時報をアナウンスの状態保存

 time_signal(0) --時報をアナウンス=切

 sound_pref_soundeffect(3) --内蔵スピーカー・ヘッドフォン

 sound_pref_output(2) --Soundflower(2ch)


 tell application "QuickTime Player"

   activate

   set audio_recording to new audio recording

   my iTunes_play_start_waiting()   start audio_recording

   my iTunes_play_stop_waiting()   stop audio_recording

 end tell


 sound_pref_output(1) --内蔵スピーカー・ヘッドフォン

 time_signal(TimeAnnouncement) --時報をアナウンスの状態復元

 tell application "System Preferences" to quit


 --iTunesの再生ボタンが押されるまで待ち

 on iTunes_play_start_waiting()   tell application "System Events"

     tell process "iTunes"

       set frontmost to true

       tell window "iTunes"

         repeat while button 7's description = "再生"

           delay 0.2

         end repeat

       end tell

     end tell

   end tell

 end iTunes_play_start_waiting


 --iTunesの再生が終了するまで待ち

 on iTunes_play_stop_waiting()   tell application "System Events"

     tell process "iTunes"

       set frontmost to true

       tell window "iTunes"

         repeat while button 7's description = "一時停止"

           delay 1

         end repeat

       end tell

     end tell

   end tell

 end iTunes_play_stop_waiting


 --システム環境設定 >> サウンド >> サウンドエフェクト

 --  3=内蔵スピーカー・ヘッドフォン

 --  1=選択したサウンド出力装置

 on sound_pref_soundeffect(n)   tell application "System Preferences"

     set current pane to pane "com.apple.preference.sound"

     tell application "System Events" to tell process "System Preferences" to tell window 1

       click radio button "サウンドエフェクト" of tab group 1 -->タブ,1,missing value

       click pop up button "サウンドエフェクトの再生装置:" of tab group 1

       delay 0.5

       click menu item n of menu 1 of pop up button "サウンドエフェクトの再生装置:" of tab group 1

       --click radio button "サウンドエフェクト" of tab group 1 -->タブ,1,missing value

       --set value of slider "警告音の音量:" of tab group 1 to v -->スライダ,missing value

     end tell

   end tell

 end sound_pref_soundeffect


 --システム環境設定 >> サウンド >> 出力 >> サウンドを出力する装置を選択

 --  1=内蔵スピーカー・ヘッドフォン

 --  2=Soundflower(2ch)

 on sound_pref_output(n)   tell application "System Preferences"

     set current pane to pane "com.apple.preference.sound"

     tell application "System Events" to tell process "System Preferences" to tell window 1

       click radio button "出力" of tab group 1 -->タブ,1,missing value

       delay 0.5

       select row n of table 1 of scroll area 1 of tab group 1 --Soundflower(2ch)

     end tell

   end tell

 end sound_pref_output


 --システム環境設定 >> 日付と時刻 >> 時報をアナウンスの状態

 on time_signal_state()   tell application "System Preferences"

     set current pane to pane "com.apple.preference.datetime"

     tell application "System Events" to tell process "System Preferences" to tell window "日付と時刻"

       click radio button "時計" of tab group 1 -->タブ,1,missing value

       value of checkbox "時報をアナウンス:" of tab group 1 -->チェックボックス,1,missing value

     end tell

   end tell

 end time_signal_state


 --システム環境設定 >> 日付と時刻 >> 時報をアナウンスの設定

 on time_signal(n)   tell application "System Preferences"

     set current pane to pane "com.apple.preference.datetime"

     tell application "System Events" to tell process "System Preferences" to tell window "日付と時刻"

       click radio button "時計" of tab group 1 -->タブ,1,missing value

       if value of checkbox "時報をアナウンス:" of tab group 1 ≠ n then

         click checkbox "時報をアナウンス:" of tab group 1

       end if

     end tell

   end tell

 end time_signal
